Tuesday, June 19, 2012

STAY OUT!

Partners in crime, Hank & Rally

Boxes are in, and we are ready for some veggies!!!

But there is STILL one more thing we need to do before we can plant our delicate little baby plants into the ground, and that is to keep our four legged furry monsters out of our garden when we are not home. Some home improvement stores have picket fence panels that are pre made (for a reasonable price) but for our purposes these pre made panels wouldn't stand a chance against our “Moose-Man” Hank. All Hank would have to do is close his eyes and barrel roll into the fence and that little fence would be history! We really liked the idea of a picket fence and Lowe's actually sells pickets individually for about a dollar a picket, so we opted to buy the pickets individually along with 2” x 6” slats to better support the pickets.


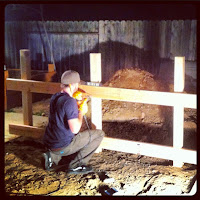
Once home, we dug three holes into the ground, placed our 4x4 posts in them and filled the holes with Quickcrete. After letting the Quickcrete set for a day, Cameron was ready to build the two panels. We used string and a level to make sure the panels were straight. Then each picket was measured out equally and nailed onto the panel. We used the top of our pickets as a level marker along with the string, as a result the tops of the pickets ended up level with each other and the bottoms of the pickets vary with the change in ground clearance.


After the main part of our fence was built, we were ready to assemble a gate. Our gate matched the same pattern of our picket fence, but had a latch on it that would be locked by dropping a pin into the ground.

Once our fence was complete, we decided to paint the fence white to match the trim of our house. Not only would the white paint look nice, but the paint also acts as a sealant to protect the wood from future water damage. The last finishing touch was to add some sort of lighting, so we can see where we are going when walking out there at night. Home Depot sells these really cool solar LED lights that mount on top of 4x4 posts, so not only do they do the job of giving off light, but they also look really nice (and are quite inexpensive, $4.50 a piece). We liked these lights so much we bought enough for all the posts on the fence and all the posts on our veggie boxes J.


The gate is now complete and we are ready to plant!

Sunday, June 10, 2012

Got Dirt?


Boxes are built and we are ready for some dirt!

Big thank you goes out to our friend Phil Holcomb, of PH Construction, who surprised us with a truckload of superb fill-dirt for our veggie boxes. We live in a very suburban area so we opted to not place chicken wire at the bottom of our boxes to defer gophers and other rodents from burrowing in our planter boxes. If you live somewhere with an abundant amount of critters it’s a great idea to lay down some type of mesh prior to filling your boxes with dirt.


We filled each box with about 16 wheelbarrows fill-dirt. If you ever need a good arm workout, shoveling dirt and transporting it to another location is excellent! Once the dirt was settled in the boxes we made another trip to Lowe’s for some compost, manure and garden soil. After reading some various gardening books they all recommend to lay down compost prior to planting your veggies. For the lack of time and not having a compost bin (as of now I have started my own compost bin, but that’s for another post) we created our own concoction of compost.


For each box we mixed 5 bags of steer manure, 2 bags of premixed compost soil ad 2 bags of garden soil. Once all the bags were opened and spread throughout the veggie boxes we started churning and mixing all the elements together to create a soil that would be very nutritious for our veggies. For the next five days we would repeat the process of mixing the soil, as well as watering the soil to insure everything is properly blended and cooled down prior to planting.

Please note, this will be the last picture of Hank & Rally in our garden boxes :)

Monday, June 4, 2012

Build Time...

Before the fun of planting and watching your veggies grow can begin; you have to decide where you are going to set up your garden and what kind of layout you are going to go with. For us it made sense to layout our garden on the side of our house, where we could block it off with a fence so the pups can’t damage any of our gardening while we are away.

We set off to Lowe's and bought our Douglas Fir lumber to create 2 garden boxes measuring 6ft x 6ft, that would be coated with some Thompson’s Water Seal to protect them from water damage and help prolong the lumber’s life. For a personal touch we decided to go with a honey color sealant to add some warmth to our garden.


Photo Recap:


Trip to Lowe's: Cameron wanted to build both boxes, so we went with Douglas Fir as our lumber of choice. Our posts would be made out of 4x4s and our panels would be made out of 2ft x 12ft pieces of lumber.


The Build: We spent a couple of nights after work measuring, cutting and building our garden boxes. We decided to go with 6ft x 6ft boxes because that's what would fit best on the side of our house, but trust me, if we had a larger area to work with, we would have gone much larger. The more veggies, the merrier :) 


Finished Product: We built the boxes near the shop, since the driveway provides a clean and flat surface to work on. Once the boxes were complete Cameron and I carried them over to their new home and completed them with a coat of Thompson’s Water Seal.